Product |
Instructions |
Extra Information |
        |
Firstly, we must prepare the area we want the final flower display. Choose a nice sunny spot in the garden, maybe in garden borders, in front of garden fences, or even in large patio planters. Remove any stones, weeds and debris from the soil. 2. RAKE Once the soil is free from debris, rake over to break up the clumps and prepare the growing medium for the seeds. Ideally rake the soil to a depth of 2.5 - 4 cm, keeping the excess soil to one side to cover the seeds later. 3. SHAKE Before you open the box, it is really important to shake the box for 30 seconds to mix the contents, for a more even spread and better final results. 4. OPEN & SOW Once the box has been shaken up and the contents mixed well, you can hold the box on it’s side and tear open the peel-back strip on the side of the box. Hold the box on an angle, and distribute the contents evenly over the prepared area. The seed carrier is a light-beige colour, so it makes it easy to see where you have distributed your seed mixture. 5. RAKE OVER Use the right amount of seed mixture for your chosen area, it should just be a fine layer over the soil, you do not need to use the entire box if you only have a small area to fill. Once you are happy with the layer of seed mixture over the soil, you can rake over again to ensure the soil has good contact with the seeds. Rake over the excess soil to make sure the seeds are covered with a fine layer of soil. This can be firmed down by shuffling across the area, this will ensure the seeds are buried in the ground to avoid birds eating the seeds. 6. WATER Finally, water the whole area well, ensuring that the ground is moist to touch but not waterlogged. Continue to water regularly, especially on warmer days when the soil can dry out. |
HINTS & TIPS Although you need to wait until all risk of frost has gone, and the weather has become warmer, you will get the best flower display the earlier you sow your seeds. All flower seeds have different germination and growth rates so if you sow your seeds from late March up until May, you will begin to see flowers in early summer. The later in the season you sow your seeds, then the later your flowers will emerge. You can sow seed mixtures in large patio containers, but make sure you use the mixture sparingly – you only need a fine layer of seed mixture to create a beautiful display. If you over-crowd an area with seeds, they will fight against each other and you will only see the same, stronger flowers appearing. If this happens, you can thin out the seedlings to let the others have a chance to grow. Leave your flower display to die-back naturally, this way other animals such as birds can take advantage of the spent flowers – for food and shelter. Some flowers will return again next year, but for best results, sow fresh seed mixture each spring. Remember that seeds take some time to germinate, so don’t be disheartened if it takes longer than you were expecting. Also seedlings will emerge first, which will just be green for several weeks in some cases, flowers will eventually emerge and grow, so it’s important to have a little patients when growing from seed. AND REMEMBER |
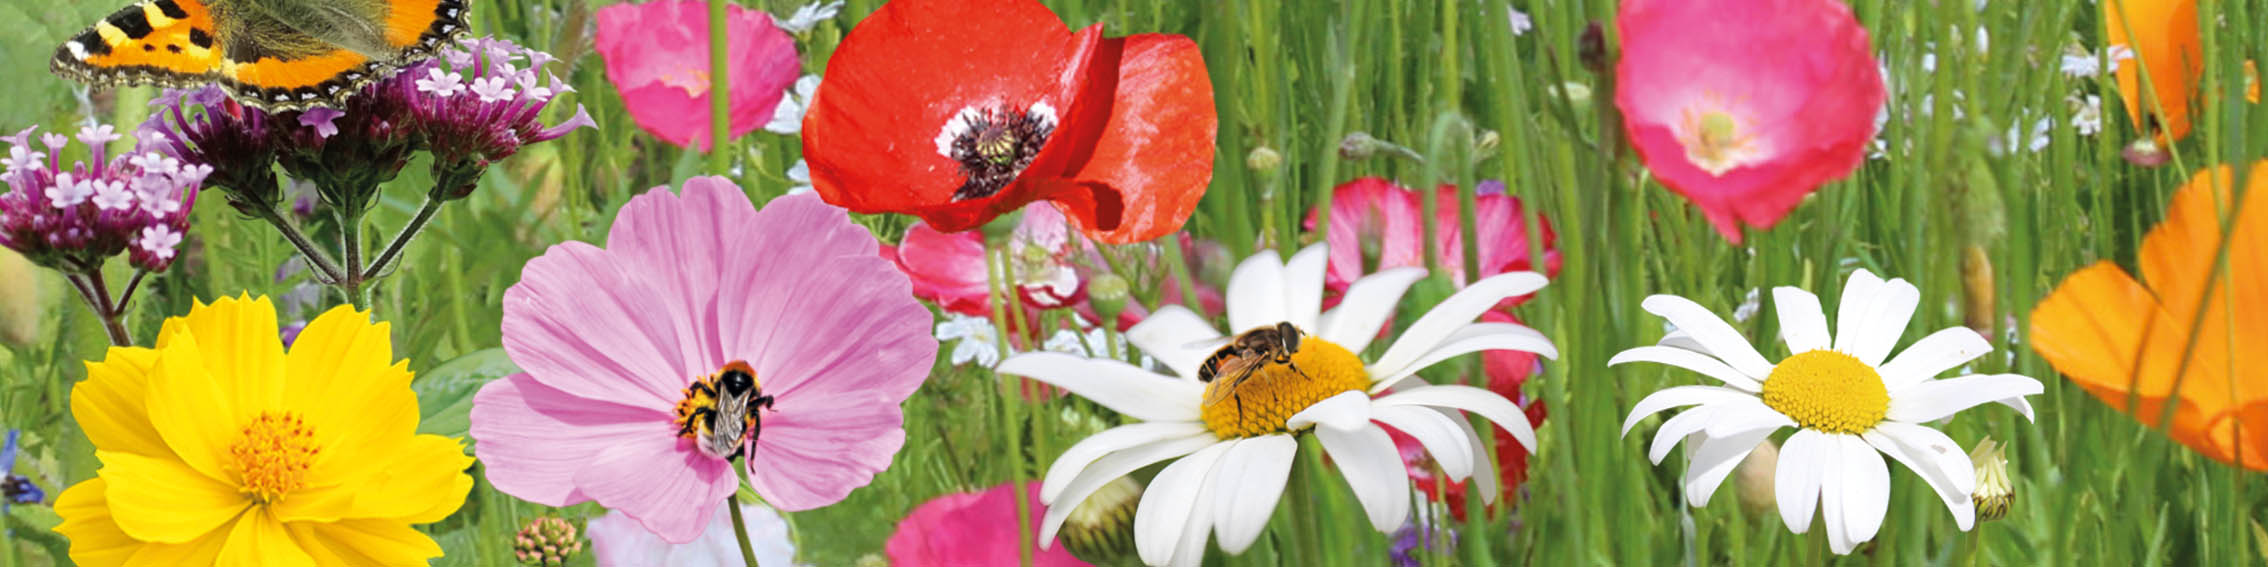
Butterfly Garden Varieties |
Detailed Instructions |
 Aster Alpinus – daisy-like flower in pink/purple shades with a yellow centre. Alpine Asters are perennial flowering, so will bloom year after year with the right care. Registered as an RHS Plant for pollinators – they are ideal for enticing butterflies and bees into the garden from July to October. Ideally sow Aster seeds indoors from February to April, at a temperature of 15-20C. Thin out seedlings when large enough to handle – ideally with 5cm spacing. Transplant individual plants into their final position, leaving 60 cm between each plant. Flowering height 30 – 60 cm – ideal for front and middle border.  Coreopsis Lanceolata – bright yellow daisy-like blooms with deep maroon centre. Tickseed Sterntaler is a perennial flowering plant, so will bloom year after year with the right care. Registered as an RHS Plant for pollinators – they are ideal for enticing butterflies and bees into the garden from June to September. Ideally sow seeds indoors from February to April, with a thin covering of soil and keep at a warm temperature of 20C. Thin out to at least 5 cm apart when large enough to handle. Transplant into containers or direct out doors to final spacing of 30 cm. Flowering height up to 30 cm – ideal for front of border and filling containers. 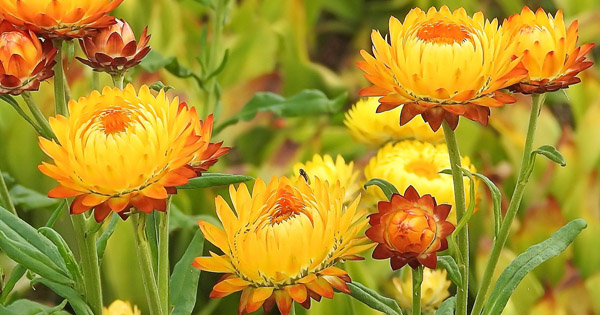 Helichrysum Bracteatum – Strawflowers with everlasting papery blooms, ideal for cut flowers or creating a classic cottage garden display. Everlasting blooms of pink, yellow and red from June through to September will attract butterflies all summer long. Sow indoors in February and March, covering with just a little fine compost and keep at a temperature of 15-20C for 2 weeks until seedlings emerge. When seedlings are large enough to handle, they can be thinned out and kept at a moderate temperature until they are ready to transplant outdoors from April. Harden off gradually in late spring, then transplant to desired local, allowing 30 cm between plants. If you have seeds left over, you can sow Helichrysum seeds direct outdoors from April, when risk of frost has gone. Flowering height up to 90 cm – ideal for back of border.  Cosmos Bipinnatus – beautiful open, daisy-like flowers in shades of pink, flecked with white. Cosmos flowers are half-hardy perennials, so depending on the weather and care these flowers can come back year after year. Ideal for creating a stunning meadow-like display with a burst of colour and perfect for cut flowers to bring into the home. Registered as an RHS Plant for pollinators – they are ideal for enticing butterflies and bees into the garden from June to October. Sow indoors from February to April, covering with just a little fine compost and keep in a warm environment 20C. When seedlings are strong enough to handle, thin out and grow on indoors until they are large enough to transplant outdoors. Gradually harden off before planting direct outdoors from May to June, allowing 30 cm between plants. Flowering height 60 – 110 cm – ideal for back of borders. |

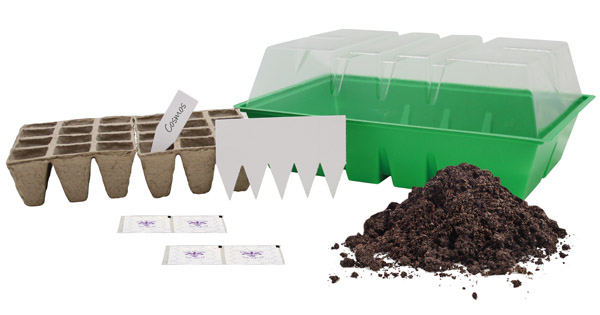 STARTING SEEDS INDOORS 1. Place the compostable seed cell trays in the plastic propagator base. 2. Fill the tray with the growing medium, keeping a little back to cover seeds. 3. If the growing medium feels dry, water until it is moist to touch. 4. Write each variety on to the plant markers and place in rows, so you will have 2 rows of each variety (8 seed cells per variety). 5. Carefully open one sachet at a time – some seeds can be tiny, so be careful not to drop them. 6. Sow seeds evenly in each cell – ideally 2-3 seeds in each cell. 7. Cover the seeds with remaining soil. 8. Water lightly, ensuring that the seeds and growing medium are moist to touch but not waterlogged. 9. Place the clear lid on the propagator tray. 10. Place the filled propagator in a warm sunny spot where seeds with germinate well. 11. Continue to water as needed, and if the seedlings begin to move towards the light, then turn each day to avoid ‘leggy’ stems. 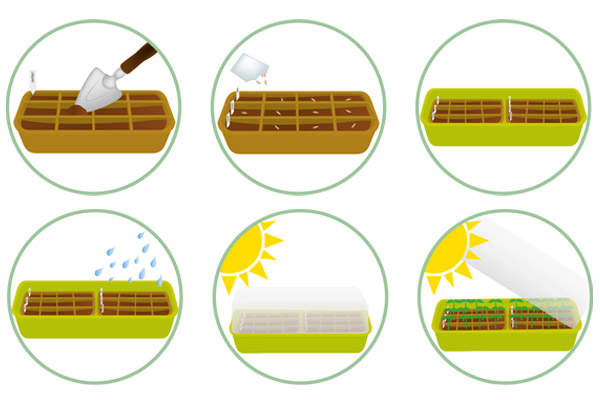 TRANSPLANTING (Some may take up to 3 weeks to germinate.) for the plants to harden off and eclimarise to outdoor conditions. from May when the weather is warmer and all risk of frost has gone. SOWING OUTDOORS We recommend you sow your seeds in the propagator indoors for the best results, but if you have seeds left over, you could stagger the sowings in the propagator or sow the remainder of seeds direct outdoors from May for a longer flowering display to help pollinators all season long. |
Product |
Instructions |
Extra Information |
   |
Firstly, we must prepare the area we want the final flower display. Choose a nice sunny spot in the garden, maybe in garden borders, in front of garden fences, or even in large patio planters. Remove any stones, weeds and debris from the soil. 2. SCATTER Simply scatter the seed bombs across your chosen area, either one by one for a neater display or several at a time for a more natural scattered display. Seed bombs can be slightly pressed into the ground to help contact with the soil. 3. WATER Once the seed bombs are scattered accross the ground, all that is left to is water them well and they will do the rest! 4. FLOWERS The seed filled bombs will naturallly degrade and disperse into the ground and the seedlings will find there way to establish roots and grow all summer long! |
• WATER – water the ground regularly to ensure the seeds or plants do not dry out. • SUNLIGHT – when choosing a position in the garden, opt for a sunny, sheltered spot when your flowers will thrive. • WARMTH – seeds will not germinate in cold temperatures, so wait until the weather becomes warmer in late spring to so flower seeds direct outdoors. HINTS & TIPS Although you need to wait until all risk of frost has gone, and the weather has become warmer, you will get the best flower display the earlier you sow your seeds. All flower seeds have different germination and growth rates so if you sow your seeds from late March up until May, you will begin to see flowers in early summer. The later in the season you sow your seeds, then the later your flowers will emerge. You can sow seed bombs in large patio containers, but you will only need 2 or 3 bombs to fill your containers. If you over-crowd an area with seeds, they will fight against each other and you will only see the same, stronger flowers appearing. If this happens, you can thin out the seedlings to let the others have a chance to grow. Leave your flower display to die-back naturally, this way other animals such as birds can take advantage of the spent flowers – for food and shelter. Some flowers will return again next year, but for best results, sow fresh wildflower seed mixtures each spring. Remember that seeds take some time to germinate, so don’t be disheartened if it takes longer than you were expecting. Also seedlings will emerge first, which will just be green for several weeks in some cases, flowers will eventually emerge and grow, so it’s important to have a little patients when growing from seed. AND REMEMBER • It is best to sow your seeds as soon as possible after purchase. Store in a cool, dry place. (Always check the sow by date on the back / base of packaging.) • As with all ornamental flowers, do not eat any flowers within this mixture. • Seeds can be eaten by birds, so if you have a lot of birds where you live, you might want to protect the freshly sown seeds with netting. |